Category: Uncategorized

  • My newer wordpress setup

    So, my current-as-of-writing wordpress setup is a wordpress container on proxmox, through cloudflare tunneling since I don’t have a static IP to my server.

    If you’re interested in replicating it, follow these steps:

    • Install ProxmoxVE onto a server
    • set it up
    • Install a wordpress container
    • Install a cloudflared container
    • configure your cloudflare tunnel
    • change a wordpress setting
    • profit

    For the sake of brevity I won’t walk you through installing and setting up proxmox. There are plenty of guides for that elsewhere.

    I will give a basic overview of everything else, though.

    WordPress

    To install a wordpress container, go to community-scripts.github.io and search for wordpress, and install it by running the given command in the proxmox host’s shell, through the web ui.

    Once the container is running, I configured and accessed the wordpress site via ssh port forwarding, like so.

    ssh popolar -L 8080:192.168.1.209:80 -L 4430:192.168.1.209:443

    In this command, popolar is the hostname of my host proxmox server that the wordpress container is running on, and 192.168.1.209 is the ip address of the wordpress container.

    If you run the same command, you’ll have to change “popolar” to your proxmox server’s hostname or IP address, and you’ll have to change “192.168.1.209” to your wordpress container’s IP Address.

    What I’m doing with this command is ssh’ing into the host, and telling it to direct all traffic that goes to my laptop”s localhost:8080 to the proxmox host’s 192.168.1.209:80, so that I can access the wordpress site by navigating to localhost:8080 on my laptop.

    Once you’ve set up wordpress, you can proceed to install cloudflared.

    Cloudflared

    To install a cloudflared container, go to community-scripts.github.io/ProxmoxVE/ and search for cloudflared. Now, find the option without DDNS and install it.

    Once you have the container, you’ll have to go to dash.cloudflare.com > Zero Trust > Networks > Tunnels, and click “Create a new tunnel” and then select cloudflared.

    After that, give it some name, and then proceed to “Install and run connectors”. Now, we’ve already got cloudflared installed in our container, so skip the first box of instructions and find the code line that says “sudo cloudflared service install ...” and copy it. It won’t match that line exactly, because the line will have a token after the “install”

    Now, enter the Console of your cloudflared container, and paste it in there and run it. You might have to manually type it in if your copy and paste aren’t working for some reason (mine weren’t). It’s long and will be a pain if that’s the case.

    Once you’ve run that, check cloudflare and see if the tunnel status is HEALTHY. If it is, proceed to edit the tunnel, and then you can edit “Published Application Routes” on cloudflare.

    As an example of what a route should look like, my config for this site looks like this:

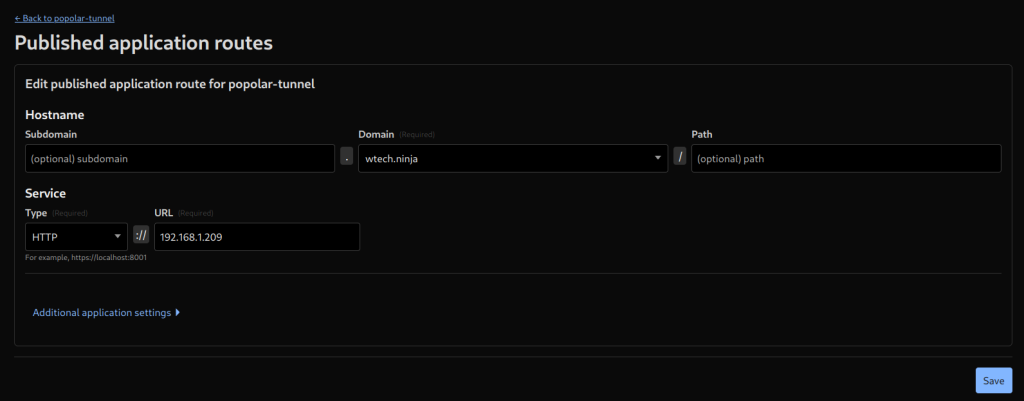
    My domain is wtech.ninja, the service type is HTTP and url is 192.168.1.209, because that is the ip address of the wordpress container. (The cloudflared container has it’s own IP address which is different)

    Change a wordpress setting

    Once you have that done, you’ll want to connect to your wordpress site via ssh port forwarding one last time, and navigate to the General Settings, and change the “WordPress Address (URL)” and “Site Address (URL)” to your proper hostname that you set up on cloudflare, instead of localhost:80 or whatever it is.

    Once you’ve changed that, try accessing the wordpress site via it’s hostname instead of using ssh forwarding, and if you’ve done everything correctly and the stars align, it might work!

    Random other thing

    I was getting some random connection errors and had to go into the Console of my wordpress container, find the file /var/www/html/wordpress/wp-config.php and add this line to it, just above the database settings:

    $_SERVER['HTTPS'] = 'on';

    Apparently since cloudflare talks to the server via http, but the clients talk to cloudflare via https, I had to set that in that file. It seems to have worked for me, anyway.

    Hopefully this info can help someone else, and thanks for reading.

  • How to identify the windings in a 9-wire 3-phase motor

    NOTE: I have diagrams for this but they broke when I migrated my wordpress pages. I will fix it soon – 2025-09-28

    You’re going to need an AC ammeter, voltmeter, and ohmmeter.

    Alright, you’ve got your nine leads in front of you and they aren’t labeled. Fantastic. To start off, you need to figure out if your motor is Wye-connected or Delta-connected.

    If it’s Wye, you will find that 3 of the leads have continuity between them, and then you’ll have 3 windings (2 leads each) that will have continuity between their ends. So, 1 group of 3, 3 groups of 2. The reason three leads have continuity is that three winding ends are already connected from the factory: 10, 11, and 12.

    If it’s Delta, you will find that there are 3 groups of 3 leads with continuity between them, with one “corner” that sits in-between the other two in each set and thus has the same resistance between it and each of the other two leads in its set.

    Now that you’ve identified the motor, proceed to the relevant section to identify the windings.

    Checking Rotation!

    Ignore this for now, this will be handy later.

    If you hook up Phases A, B, and C to lines 1, 2, and 3 the motor should turn CCW from the non-drive end, or CW from the drive end. This is standard rotation for both NEMA and IEC motors.

    Identifying a Wye motor

    Alright, grab the three leads that have continuity, and temporarily mark them as 7, 8, and 9. Now, hook up phase A to 7, B to 8, and C to 9. Bump-start the motor to check rotation. If it’s correct, keep your initial marks. If it spins the wrong way, swap two windings and try again. After you’ve confirmed it spins the correct direction, mark the windings accordingly.

    Now, this is where it gets tricky, so you’ll want to look at the diagram up above to get a better picture of what is going on. Basically, if you connect 4 and 7 correctly, you’ll measure a higher-than-supply voltage from 1 to 8 / Phase B, and from 1 to 9 / Phase C.

    The two measured voltages, 1-8 and 1-9 should be very close. If they aren’t, try again with a different winding until you find the one where they are very close.

    If the two measured voltages are the same, but they’re lower than supply voltage, that means you have the winding hooked up backwards (1-7 instead of 4-7). So, swap the connections and try again.

    Once you find the correct second winding for phase A/7, mark the winding ends accordingly with 4 and 1 and repeat the process for the other two phases/windings.

    When you’ve identified all of them, hook up the motor for whichever voltage configuration you want to use, and then check if it runs smoothly. If it doesn’t, start over.

    If you’re hooking this motor up in the low-voltage configuration, you can test your labeling by connecting it in the high-voltage configuration to the lower voltage before wiring it properly.

    To hook up for High Voltage, connect 4-7, 5-8, and 6-9. This adds the extra windings in series with the original wye.

    • 4 & 7 (L1)
    • 5 & 8 (L2)
    • 6 & 9 (L3)

    To hook up to Low Voltage, connect 4, 5, and 6 to create a second star point, and then connect the new wye in parallel with the existing wye by connecting 1 & 7, 2 & 8, and 3 & 9. So:

    • 4, 5 & 6
    • 1 & 7 (L1)
    • 2 & 8 (L2)
    • 3 & 9 (L3)

    If it is working well, check your current on each line A, B, C to make sure they are roughly equal, and as long as they are, you should be good to go. Congrats! You successfully re-labeled a motor. There’s only a 1 in 3 chance it matches the factory labeling, but that doesn’t matter.

    Identifying a Delta Motor

    Alright. So you’ve got your 3 groups of 3 leads. The first thing you’ll want to do is identify the corners if you haven’t already, so ohm them out until you find the ones that are in-between the others. Refer to the diagram if you want to better understand this.

    Now, mark the corner leads as 1, 2, and 3. (these may change later, so don’t mark it too permanently)

    So one cool thing about delta motors is you can make it rotate using any one set of 3 leads that you have, so what we’ll do then is identify the other two wires in each triangle by checking the motor’s rotation.

    When I do this I normally label the two unmarked wires straight off the bat, and then change them if I’m wrong. So, hook up A to 1, B to 4, and C to 7. Now, bump start the motor to check rotation. If it’s correct, the wire with the B phase is indeed 4. If it spins the wrong way, then the B phase wire is actually 7. Change your connections as needed and relabel accordingly, then move to the next phase.

    For the second winding, we hook up B to 2, C to 5 and A to 7. And again, check rotation and relabel accordingly.

    For the third winding, we hook up C to 3, A to 6, and B to 8. Again, check rotation and relabel accordingly.

    Now that you’ve got all your leads labeled, you’d think you were done, right? Sadly, no. Because, We don’t actually know if we labeled our #2 lead and #3 lead correctly at the start.

    So you’re going to want to start the motor, just briefly, and see if it sounds smooth or if it sounds terrible. If it sounds terrible, swap your two bottom triangles. What that’ll look like is 2 -> 3, 5 -> 6, 7 -> 8. And the other one does the opposite, obviously.

    Now, to hook it up for High Voltage, connect the ends of the three triangles. This is the exact same as the wye high voltage connection, which is:

    • 4 & 7 (L1)
    • 5 & 8 (L2)
    • 6 & 9 (L3)

    To hook it up for Low Voltage, you’ll merge all three triangles. What that looks like is:

    • 1, 6, & 7 (L1)
    • 4, 2, & 8 (L2)
    • 9, 5, & 3 (L3)

    With that done, your motor should run better and you should be set! Congrats! You successfully identified the leads. There’s only a 1/3 chance that they match the manufacturer’s labeling, but that doesn’t matter.